Save now, cook later.
Instant Pot Brown Rice
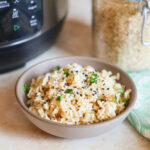
Want perfectly fluffy rice every time? Make it in the Instant Pot! This trusty appliance makes preparation foolproof, whether cooking long or short-grain brown rice or black or red rice. Serve it as a side, or scoop it into bowls, burritos, or salads for an easy flavor and nutrition upgrade!
Servings: 8 servings
Ingredients
- 2 cups brown rice basmati, Jasmine, short grain, or long grain
- 2 ½ cups water or vegetable broth
- ½ teaspoon salt optional
Instructions
- Add the rice, water (or broth), and salt to the Instant Pot.
- Pressure cook on HIGH for 24 minutes.
- Let the Instant Pot naturally release pressure for 10–15 minutes, then manually release any remaining pressure.
- Remove the lid, fluff the rice with a fork, and use as desired.
Video
Notes
Storage Directions
- Refrigerating: Once cooled to room temperature, store the rice in the fridge for up to 5 days.
- Freezing: Cooled rice can be frozen in a freezer-safe container for up to 3 months. For easier defrosting, freeze it in portions using a silicone tray.
- Reheating: Warm the rice in the microwave on gentle heat or in a saucepan with a splash of water or broth until heated through.
- Don't Worry About Rinsing: While you can rinse the rice if you prefer, it’s not necessary. Simply add the dry rice to the pot with the liquid and salt, then start cooking—it’s that simple.
- Make a Large batch: I recommend cooking at least 2 cups at a time. Larger batches of rice tend to cook better in the Instant Pot thanks to better steam retention and a reduced risk of scorching or dry spots. To meal prep rice for the week, double or triple the recipe and pressure cook for the same amount of time (24 minutes); the Instant Pot will naturally adjust the time it takes to come to pressure.
- Fluff, Don’t Stir: Use a fork or rice spatula to gently fluff the rice, keeping the grains separate and releasing any trapped steam. Avoid stirring, as this can cause the grains to clump and create an inconsistent texture.
- Season After Pressure Cooking: While you can cook the rice with salt, other seasonings—such as fresh herbs, spices, and acidic ingredients—are best added after cooking for the brightest flavor and best texture.
Nutrition
Calories: 172kcal | Carbohydrates: 36g | Protein: 4g | Fat: 1g | Saturated Fat: 0.3g | Polyunsaturated Fat: 0.5g | Monounsaturated Fat: 0.5g | Sodium: 151mg | Potassium: 127mg | Fiber: 2g | Calcium: 18mg | Iron: 1mg